


A “disk boot failure” error appears when your computer can’t find or load the system files it needs to start Windows.
Instead of booting normally, the process cuts off early and displays a message such as “Disk Boot Failure – Insert System Disk and Press Enter”. At this point, your PC is unable to reach your operating system and desktop, which leaves your files temporarily inaccessible.
This issue can happen to any Windows system, and can stem from a range of causes. This could be anything from a simple incorrect boot sequence or loose cable. It could also be more complex problems like corrupted system files or a damaged device that demands SSD or hard drive recovery. In some cases, the error follows a firmware change, a recent hardware upgrade, or an unexpected shutdown.
If you’re dealing with a disk boot failure, it’s important to approach the problem carefully. Some repair tools (like CHKDSK or MBR rebuild utilities) can fix software-related issues, but they can also cause data loss if the underlying problem is a failing drive.
The good news: Most disk boot failures can be resolved safely.
In this guide, we’ll walk you through the safest troubleshooting steps and help you protect your data throughout the process.
Common Causes of Disk Boot Failure
A disk boot failure can originate from several underlying issues: some harmless and easy to resolve, others more serious and complex to resolve. Let’s take a look at some of the potential causes, categorised to make it easier to understand where the problem may be coming from.
Software-Related Causes
These software-based issues prevent Windows from finding or loading its system files properly.
- Incorrect boot sequence: Your system may be attempting to boot from the wrong device (for instance, a USB drive or secondary HDD) instead of the main OS drive.
- Unconfigured or newly installed hard drive: A new drive may not contain boot files yet, or may not be properly initialised.
- Corrupted or missing system files: Power loss, failed updates, or malware can damage essential files needed during startup.
- Firmware issues: Outdated or corrupted BIOS/UEFI firmware can cause drive detection problems or prevent Windows from loading.
Hardware-Related Causes
These issues relate directly to your system’s physical components:
- Loose, damaged, or disconnected cables: SATA or power cables that are partially disconnected can cause the drive to vanish intermittently or completely.
- Failing HDD or SSD: Clicking, slow performance, or disappearing drives in BIOS often indicate a drive approaching failure.
External or Other Causes
Your system might be facing other issues unrelated to either software or your main OS drive’s hardware, such as:
- Peripheral devices interfering with boot: USB storage devices or external drives can sometimes confuse the boot order.
- Missing or damaged operating system: If essential boot files are corrupt or the OS partition is damaged, the system cannot proceed.
By understanding which category your situation fits into, you can make a more informed choice about the safest troubleshooting steps to take and minimise the risk of unnecessary data loss.
How To Fix Disk Boot Failure
If you’re encountering a disk boot failure error and want to fix it, here are a few simple solutions that you can attempt which may resolve your issue.
We’ve ordered the fixes from the simplest, least invasive at the start of the list, to the more complex and high-risk ones further down. Your best bet is to work your way down the list, and stop when any of the steps resolve your disk boot failure.
If you don’t see any results, all hope isn’t lost. At Secure Data Recovery, we can help you using advanced repair and recovery techniques.
Before You Begin: Protect Your Data
Before you start troubleshooting a disk boot failure, it’s important to proceed carefully.
While many fixes are safe, others — especially CHKDSK, firmware updates, and MBR repair — can cause permanent data loss if your drive is already failing.
Here are a few red flags that mean you should stop immediately and contact a professional:
- Clicking, beeping, or grinding noises
- Drive disappearing from BIOS
- Extremely slow response or freezing during startup
- Recent drops, shocks, or liquid exposure
Note: Steps 6–9 in the next section involve actions that write to your drive disk. Stop here if you’re dealing with irreplaceable files or suspect that your storage hardware might be failing.
Instead, get in touch with us. Our data recovery services can help you repair your drive and restore your files safely.
1. Perform a Hard Reset
A hard reset is the simplest potential fix for the disk boot error, and could clear any temporary glitches that may be blocking the boot process.
To perform a hard reset:
- Press and hold the power button for 10 seconds until the PC turns off.
- Wait a few moments.
- Press the power button again to restart your system.
If the error persists, move to the next step.
2. Remove Peripheral Devices
External USB drives, printers, or accessories can sometimes disrupt the boot sequence. To rule out the possibility that your peripheral devices are preventing your system from booting, disconnect them:
- Power off the computer.
- Disconnect all non-essential peripherals — USB sticks, external drives, printers, etc.
- Restart your computer.
If it boots normally, reconnect devices one at a time to identify which one is causing the issue.
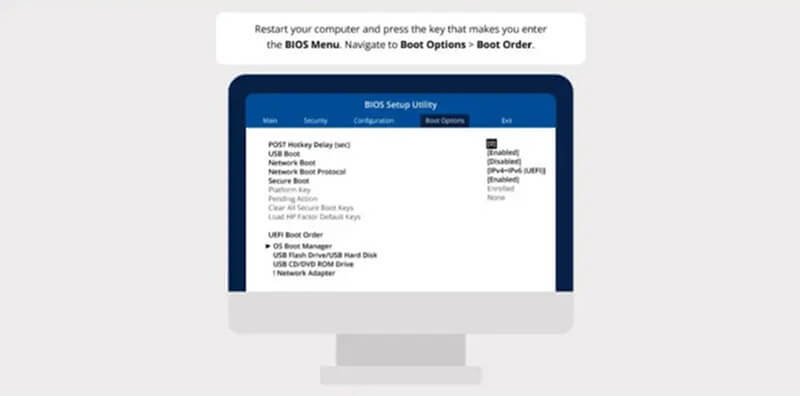
3. Check the BIOS Boot Order
Your PC may be trying to boot from the wrong device. You can find these settings by diving into your computer’s BIOS or UEFI settings.
To check the boot order in the BIOS:
- Restart and press DEL, F2, F10, or ESC to enter BIOS/UEFI.
- Navigate to Boot, Boot Priority, or Boot Order.
- Make sure your primary system drive is listed first.
- Optionally, select Load Default Settings if the BIOS looks misconfigured rather than setting the boot order yourself.
- Save your changes and restart.
If the boot drive isn’t listed at all, you may be dealing with a connection issue or failing hardware.
4. Run Preboot Diagnostics
Certain hardware components, like your RAM, motherboard, or your drive itself could be malfunctioning and causing your boot failure. To find out whether this is the case, you’ll need to run a preboot diagnostics test.
Different computer manufacturers have their own procedures, so check your manual or the manufacturer's website for specific instructions. Follow these steps if you have a Dell or HP system:
On Dell systems:
- Restart your computer
- At startup, repeatedly press F12, then choose Diagnostics.
- Note any error codes when troubleshooting.
On HP systems:
- Restart your computer
- At startup, repeatedly press Esc.
- Select HP PC Hardware Diagnostics > Symptom Tests
- Find the symptom that best matches your computer’s issue in the list. Then, type the corresponding number into the field at the bottom of the screen and then press Enter.
- After the test has completed, review the results and note any error codes for reference.
5. Boot From Another Device or Installation Media
If your system is struggling to boot Windows from its main drive, it’s worth testing whether it can boot from another source instead.
To do this:
- Insert a bootable USB drive (ideally Windows installation media).
- Enter BIOS and set the USB as the first boot device.
- Save and restart.
If your PC is able to successfully boot from USB but not from the internal drive, the root cause of your problem is likely your primary disk.
For many of the next few repair steps, you’ll be using the same Windows installation USB drive.
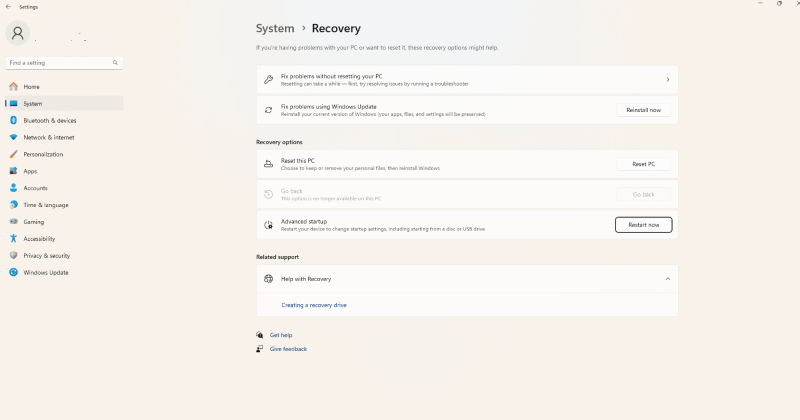
6. Run Windows Startup Repair
Startup Repair can automatically fix common boot issues such as corrupted system files or damaged boot records. To run Startup Repair:
- Boot from Windows installation media.
- Select Repair your computer > Troubleshoot > Advanced options > Startup Repair.
- Choose your Windows installation and let the tool run.
If Startup Repair can’t fix the problem, it will display a message with additional details. Note these details: they will be useful if none of the DIY fixes resolve your issue and you need to seek out professional assistance.
7. Run CHKDSK Carefully
If your disk has file system errors on it, the CHKDSK tool can repair these. However, it’s important to exercise caution here: if you hear any clicking, grinding, or buzzing noises, this could suggest that your drive is failing. If this happens, stop CHKDSK immediately, as it can destroy recoverable data.
To run CHKDSK:
- Boot from installation media.
- Select Repair your computer > Troubleshoot > Command Prompt.
- Enter the following command, replacing “C” with your Windows system drive letter:
- chkdsk C: /f /r
- Press Enter and let the scan complete.
If CHKDSK stalls, repeats errors, or gets stuck, stop immediately — this could be an indication that your drive is failing.
8. Repair the Master Boot Record (MBR)
The Master Boot Record (MBR) tells your system where to find the operating system so it can kickstart its boot process. If the MBR is damaged or corrupted, it can prevent your PC from locating Windows.
To repair your computer’s MBR:
- Boot from installation media.
- Open Command Prompt.
- Run each of the following commands one at a time:
- bootrec /FixMbr
- bootrec /FixBoot
- bootrec /ScanOs
- bootrec /RebuildBcd
- Restart your PC.
If you receive an “Access Denied” message, or your Windows installation isn’t detected, you’re likely dealing with a more severe form of corruption.
9. Update Firmware
Outdated or corrupted firmware can sometimes cause drive detection issues and boot failures. Updating your device to the latest firmware version can resolve these issues.
However, make sure to download the firmware directly from the manufacturer's website to avoid potential risks. Incorrectly updating firmware can lead to data loss, so proceed with caution and follow the manufacturer's instructions carefully.
To update your firmware:
- Download the correct firmware from the manufacturer’s website.
- Create a bootable USB with the update.
- Boot from the USB and follow on-screen instructions.
Remember: an incorrect or interrupted firmware update can permanently brick your system and cause irreversible data loss. Only proceed with this step if you’re fully confident in the process. If not, reach out to us — we can ensure your data is safe and your firmware is up-to-date.
When to Stop Troubleshooting Disk Boot Failures
If you’ve worked through the main repair steps and your PC still won’t boot, it’s time to pause and take a step back — especially if you’re seeing signs that your drive itself might be failing.
Continuing to run tools like CHKDSK, Startup Repair, or firmware updates on a damaged disk can overwrite any remnants of recoverable data still present, and even make its failure worse.
Stop immediately if you notice any of the following:
- Clicking, buzzing, or grinding sounds from the drive
- The disk disappearing from BIOS or showing inconsistent detection
- Extremely slow access, freezing at startup, or repeated BSODs
- A recent drop, power surge, or liquid exposure
These symptoms all indicate physical drive failure: something that software fixes are unable to resolve.
At this point, your best bet is to contact professional HDD or SSD recovery. Secure Data Recovery offers:
- Certified cleanroom facilities for safe physical handling of your device
- Advanced diagnostics and imaging tools that prevent further damage
- A no-recovery, no-fee guarantee, so availing our services comes with zero risk to you.
Your data is just as important to us as it is to you. If the DIY repair attempts haven’t worked, let us step in to protect and recover your files. Give us a call today at 0800 102 6925, or contact us via our online form!
Tips to Prevent Future Boot Failures
A little preventive care can go a long way towards maintaining your computer's health and preventing future issues like boot failures.
Here are a few useful, easy tips to prevent future boot failures:
- Keep your hardware clean: Dust buildup can cause overheating and instability. Gently clean vents and fans every few months to maintain proper airflow within your case.
- Keep your PC up to date: Install Windows updates, driver updates, and firmware patches from trusted sources. These often fix bugs that lead to boot issues.
- Back up your data regularly: Use an external drive or cloud storage to keep copies of important files. A reliable backup is your best defense against unexpected failures.
- Monitor drive health: Tools like SMART monitoring utilities can alert you to early signs of drive degradation before problems become severe.
- Use reputable antivirus protection: Malware can corrupt system files and damage boot sectors. Keep your security software updated and run regular scans
By practicing these habits consistently, you'll keep your system healthier, and significantly lower the chance of future boot errors.
Professional Data Recovery for Boot Failures
A disk boot failure can bring your entire system to a halt — but it doesn’t have to mean losing your data.
Whether the issue stems from corrupted boot files, a failing hard drive, or a firmware problem that got out of hand, the safest way forward is to avoid DIY risky repairs, and instead, let the experts step in.
At Secure Data Recovery, we specialise in handling severe boot and drive failures that software tools can’t fix. With certified Class 10 ISO 4 cleanrooms, advanced diagnostics, and an industry-leading 96% success rate, we can safely recover data even when your desktop or laptop refuses to boot up. And with our No Data, No Recovery Fee guarantee, you’re never at financial risk.
If your PC still refuses to boot,or you’re unsure whether it’s safe to keep troubleshooting, our engineers are here to help.
Need professional data recovery? Give us a call at 0800 102 6925 or start your case online today!


