


If your computer is displaying a “hard drive not detected” message, this means it can’t see a storage device that should be available. This can affect HDDs and SSDs, regardless of whether they’re internal or external drives. Typically, you’ll see the message appear during startup or once your operating system has loaded.
These detection problems typically fall into one of two categories. Logical issues include things like driver problems, file system corruption, or misconfigured system settings. Physical issues, on the other hand, involve hardware faults, power problems or failing components within your drive. This difference is important: while you can fix some issues safely at home, others make DIY troubleshooting risky and put your data at risk of permanent loss.
That’s why it’s important to approach this issue carefully. In this guide, we’ve outlined steps to help you identify what’s wrong, and how to avoid common mistakes. And if the situation suggests that your hardware is failing, or your data is particularly important, professional data recovery services are likely your best bet.
Secure Data Recovery can help provide a safer path forward, with expert diagnostics and a No Data, No Recovery Fee guarantee.
Why Is My HDD Not Detected?
Before troubleshooting why a hard drive isn’t showing up, it helps to understand where detection is failing. A drive can fail to be recognised at various stages of the startup process, and each location points to a different underlying cause.
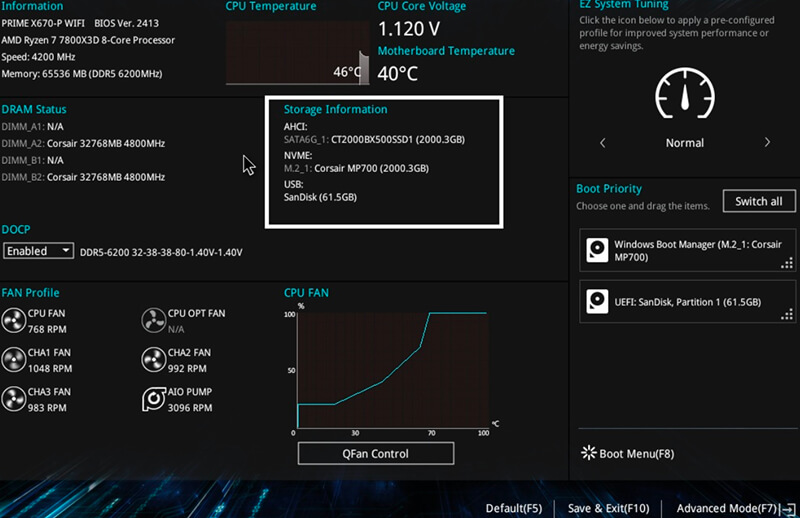
BIOS / UEFI
For internal drives, detection starts in the BIOS or UEFI firmware. If the drive does not appear here at all, the issue is often hardware-related. This could mean a faulty cable, power problem, firmware issue, or a failing drive. External drives usually won’t appear in BIOS unless you have one that’s set up as a boot device.
What this means: If your internal drive is missing from BIOS/UEFI, software fixes inside Windows or macOS are unlikely to work. Indeed, if the drive in question is your boot drive, your Windows or Mac won’t be able to boot.
File Explorer / Finder
If your drive appears in Disk Management or Disk Utility but not in File Explorer (Windows) or Finder (Mac), this means your operating system can see the device, but can’t access its data. This often points to formatting issues, missing partitions, or file system corruption.
What this means: The drive likely still contains data, but your OS is unable to mount it properly.
Disk Management / Disk Utility
These inbuilt drive management tools show all connected storage devices, even if they’re unformatted or damaged. A drive may appear here as RAW, uninitialized, offline, or without a drive letter.
Warning: If your drive contains existing data, do not initialize, format, or repartition it. These actions permanently erase files and significantly reduce your recovery chances.
Causes for Hard Drive Not Showing Up
When a hard drive isn’t being detected, the root cause tends to fall into one of three categories: software/configuration issues, hardware or connection problems, or external/user-triggered factors.
Let’s take a closer look at each of these sets of root causes, and their associated risk level and best steps forward.
Software / Configuration Issues
These problems occur when the drive is physically in good working condition, but the system isn’t able to communicate with it properly:
- Incorrect boot or startup settings: The system may be trying to boot from the wrong device or ignoring the drive altogether.
- Outdated or corrupted drivers: Without the correct drivers, Windows or macOS may fail to recognise the drive.
- Firmware issues: Incompatible or corrupted firmware can prevent detection at both BIOS and OS level.
- File system corruption: Damage to the file system can make a drive unreadable even though it’s still present.
- Malware: Certain infections interfere with system drivers or hide connected storage devices.
These causes are usually fixable with software-based troubleshooting, as long as your drive doesn’t also show any physical symptoms.
Hardware / Connection Issues
Issues stemming from hardware or connection failures tend to be higher-risk, and generally can’t be resolved with software fixes:
- Loose or damaged cables (SATA, USB, power)
- Failing HDDs or SSDs with worn components
- Power delivery problems, especially in external drives
- External enclosure or adapter failures
If your drive disappears intermittently, freezes the system, or makes unusual noises, software fixes may worsen the damage. If this describes your situation, your best bet is to get in touch with a specialist.
External and User-Triggered Causes
Everyday actions can also lead to detection issues:
- Peripheral conflicts during startup
- Improper ejection of external drives
- Sudden shutdowns or power loss
- Drive letter conflicts in Windows
Identifying which categories best applies to your case can help you determine whether DIY troubleshooting is safe, or if it’s time to seek SSD or hard drive recovery.
Quick Steps To Fix Hard Drive Not Detected
Before moving on to advanced troubleshooting, it’s worth ruling out a few simple, low-risk issues. These checks apply only to external hard drives. If your drive is internal, skip this section — unless you’re experienced with opening up your computer, doing so can cause further damage or void warranties.
Here are a few simple steps to get started with:
- Restart your computer to eliminate any temporary detection glitches.
- Try a different cable, USB port, or computer to rule out a possible faulty connection or power issue.
- Disconnect unnecessary peripherals (printers, USB hubs, cameras) that may be causing issues with detection.
- Update your operating system and drivers — outdated software can sometimes prevent drives from being recognised.
- Run a malware scan, since infections can disable drivers or hide connected storage.
- Inspect the drive externally for visible damage such as cracks, dents, or corrosion — without opening up your computer’s case.
Warning: Unless you’re experienced and recognise that it may void your warranty, avoid opening up your computer’s case at all costs. And if your drive is clicking, overheating, or causing system freezes, stop immediately; these are signs of physical failure.
If none of these quick checks helped, it’s time to move on to the more targeted diagnostics. We’ll discuss some of the best options in the next section.
Advanced Solutions for Hard Disk Drive Not Detected
Before you proceed with the advanced troubleshooting steps outlined in this section, bear in mind that they’re more technical, and should be approached with caution.
If your drive is failing physically, some of these steps can actually increase your risk of permanent data loss. If you notice any clicking sounds, overheating, repeated freezes, or the drive disappearing intermittently, stop here. Your best bet is to consider professional assistance instead.
Check BIOS / UEFI or Startup Disk Settings
If your drive isn’t being recognised at a low system level, your operating system won’t be able to access it. Here’s how you can troubleshoot this issue.
Windows (BIOS / UEFI)
- Restart your computer and press the BIOS key during startup (commonly F2, F10, Del, or Esc).
- Navigate to the Boot or Storage section.
- Confirm the drive is listed and enabled.
- If the drive contains the OS, ensure it’s set as a boot device.
- Save changes and exit.
If your drive doesn’t appear here at all, then it’s likely the root cause is hardware-related.
MacOS (Startup Disk)
- Open System Settings > General > Startup Disk.
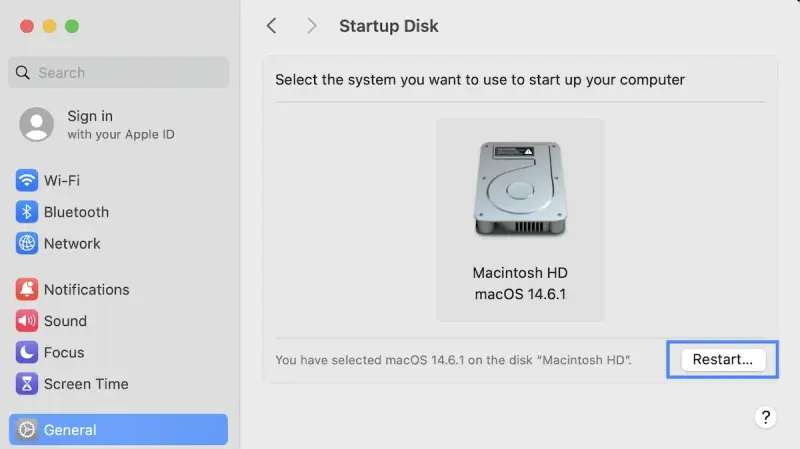
- Confirm the correct internal drive is selected.
- Restart your Mac.
If the detection issues remain, you can reset PRAM/NVRAM, which stores startup-related settings. To do so:
- Shut down your Mac.
- Power it on, then immediately hold Option + Command + P + R until you hear the startup sound twice or see the Apple logo reappear.
- Select the Reset PRAM/NVRAM option.
If your drive still isn’t appearing, proceed to the next troubleshooting step.
Update Drivers and Firmware
Out-of-date or corrupted drivers can sometimes prevent your hard drive from being detected. Bringing your drivers up-to-date ensures optimal performance and compatibility, and may help your hard drive to be recognised again.
Windows
- Open Device Manager.
- Expand Disk drives.
- Right-click the affected device and select Update driver.
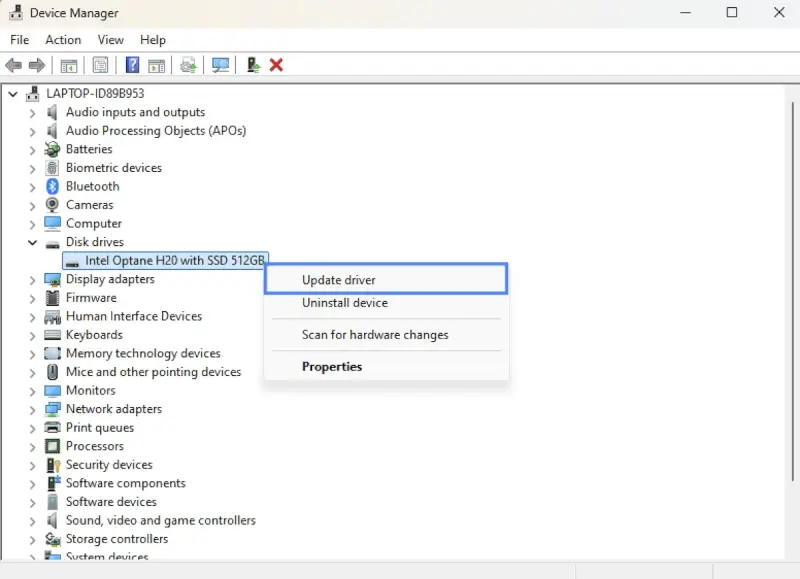
- Choose Search automatically for drivers.
If Windows doesn’t find a suitable driver, try searching your device manufacturer’s website for the latest driver and install it manually.
Mac
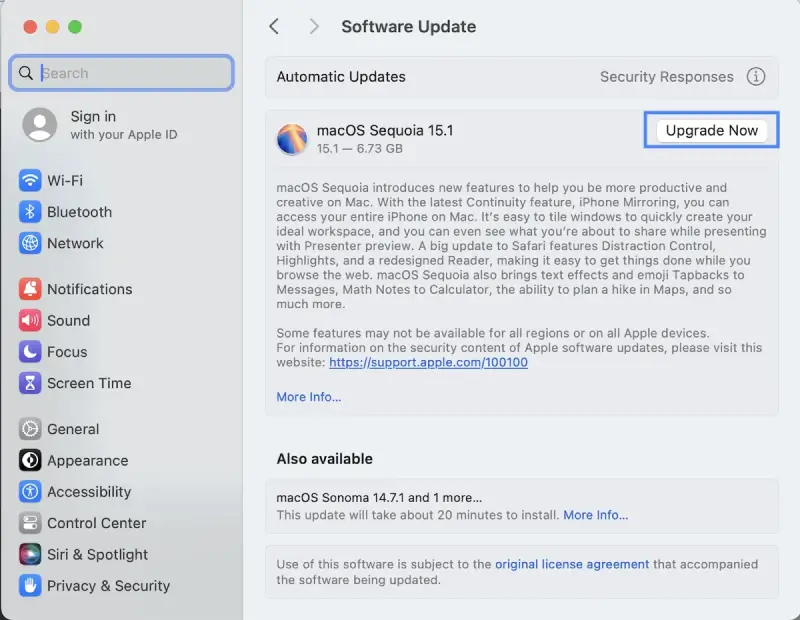
- Go to the Apple menu and select System Settings
- Click on Software Update.
- If updates are available, click Update Now or Upgrade Now.
If you’re running an older Mac without the Software Update option, use the App Store to check for updates.
Repair File System Issues (Proceed with Caution)
If your hard drive’s file system has been corrupted, this can prevent the drive from mounting even if its hardware is still functional. To repair this, follow the steps below.
Windows
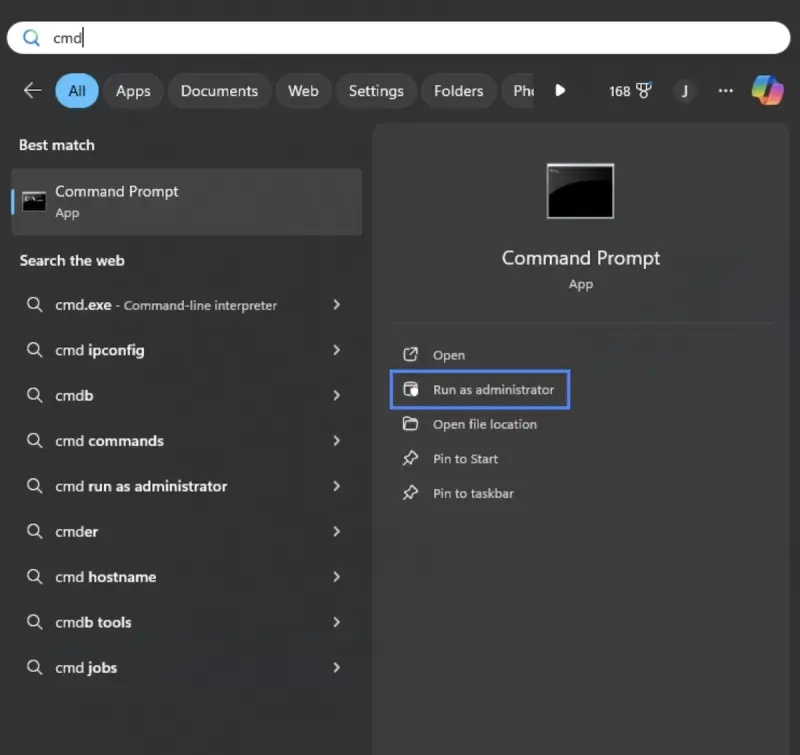
- Type “cmd” into the Windows search bar, then right click on Command Prompt, and select Run as Administrator.
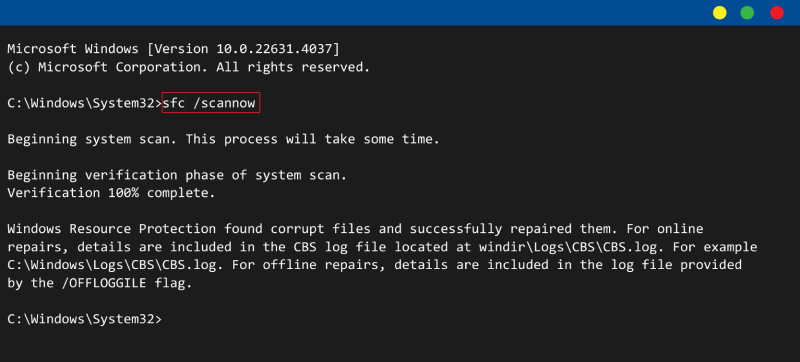
- First, run the System File Checker (SFC) tool by typing the following command: sfc /scannow
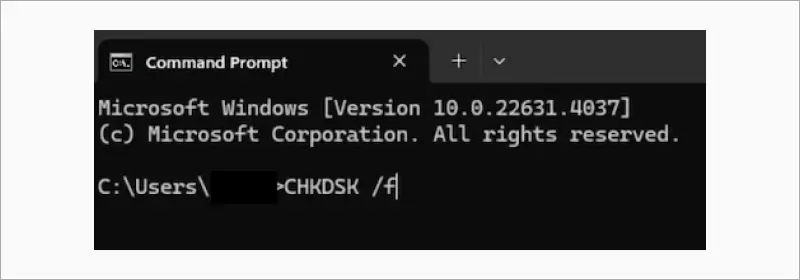
- Next, run CHKDSK by entering the following command, replacing “X” with your drive’s letter: chkdsk X: /f
Warning: Do not run CHKDSK on a drive that is clicking, freezing, or intermittently disconnecting. If interrupted or used on a failing drive, CHKDSK can make recovery more difficult.
Mac
- Open Disk Utility
- Select View > Show All Devices
- Run First Aid on volumes first, then containers, then the drive itself
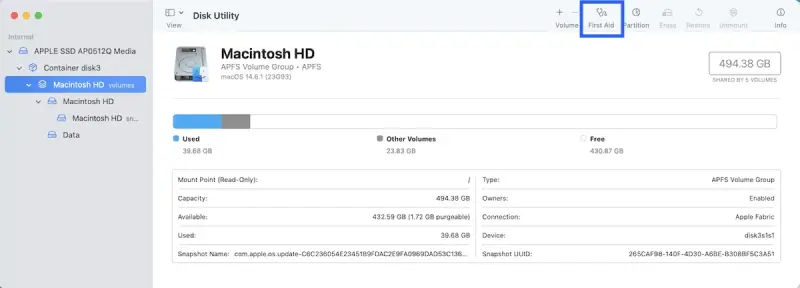
Warning: Stop immediately if Disk Utility reports it cannot repair the disk or that the disk is failing. Continuing can worsen the damage.
If these advanced steps don’t restore detection, or reveal signs of failure, your safest next step is professional data recovery rather than attempting any further DIY fixes.
Preventing Hard Drive Detection Issues
Hard drive failures aren’t always avoidable, and they tend to happen unexpectedly. However, following a few best practices can significantly reduce your risk of encountering detection problems and data loss.
- Eject drives properly: Always use “Safely Remove Hardware” on Windows or “Eject” on macOS before disconnecting external drives to prevent file system corruption.
- Use surge protection or a UPS: Power surges and sudden outages can damage drives or corrupt data during read/write operations.
- Avoid physical shock and heat: Drops, vibrations, and overheating can cause mechanical or electronic failure, especially in portable drives.
- Keep drivers and firmware updated: Manufacturer updates often fix compatibility and detection issues. Only install firmware from official sources.
- Don’t fill drives to capacity: Leaving 10-20% of your drive free helps maintain performance and reduces the risk of corruption.
- Maintain regular backups: Backing up your data means that even if your drive suddenly becomes undetectable, you can rest assured that your files are safe.
Proactive care won’t fully eliminate the risk of your hard drive failing one day. However, it will greatly improve your drive’s longevity, and your peace of mind.
When To Contact Experts for a Hard Drive That Won’t Show Up
At a certain point, continuing to DIY troubleshooting can do more harm than good — and in some cases, it can increase your risk of permanently losing your data.
If you notice any of the following, stop immediately and seek professional help:
- Clicking, grinding, or buzzing noises from the drive
- The drive is not detected in BIOS/UEFI at all
- The drive overheats, freezes the system, or disconnects repeatedly
- Frequent operating system crashes when the drive is connected
- Your data is critical or irreplaceable (business documents, personal records, photos, etc.)
These symptoms often are a sign of physical or advanced logical failure, which software tools cannot safely fix.
Professional data recovery services like Secure Data Recovery use certified cleanroom environments, advanced diagnostics, and safe sector-by-sector imaging to preserve data before recovery begins. This controlled approach protects your files and maximises success.
With a 96% success rate and a No Data, No Recovery Fee guarantee, Secure Data Recovery is a reliable, affordable, and convenient option to recover your drive when the stakes are high.
If you’re dealing with an undetectable hard drive and DIY fixes aren’t working for you, get in touch with us today — we’ll help you sort it.
Give us a call today at 0800 102 6925 to speak with a specialist and take the safest path towards getting your data back!


