


When a computer partition fails, panic often follows. Whether you use Windows or macOS, your partition holds valuable data, from personal documents and photos to critical business files. A failed partition doesn’t always mean your data is gone, but restoring access safely requires careful steps and the right tools.
Secure Data Recovery, the trusted authority in SSD, RAID, and hard drive recovery, delivers expert solutions on everything you need to know about how to approach partition failure with clarity and confidence, minimising data loss and restoring functionality as quickly as possible.
Signs of Partition Failure
Before attempting to fix a failed partition, you need to confirm that the issue stems from the partition itself, not the entire drive or operating system. A failed partition typically shows specific warning signs that should not be ignored.
Here are some common symptoms of a failed partition:
- Drive or volume not appearing in File Explorer (Windows) or Finder (macOS), even though the storage device is connected.
- System prompts to format the drive, warning that it’s unreadable or unrecognised.
- Error messages such as Drive is not accessible, RAW file system, or Volume cannot be mounted.
- Missing files or folders from a previously visible partition.
- Significant slowdowns or freezing when accessing specific folders or launching programs stored on the affected partition.
- Disk Utility (Mac) or Disk Management (Windows) shows the partition, but it’s marked as unallocated, RAW, or has no assigned drive letter.
Lost Partition vs. Hardware Failure
It's important to differentiate between partition-level failure and a complete drive failure:
- A lost partition means the drive itself is physically operational, but the structure that tells the OS how to read stored data is damaged.
- A failed drive typically involves physical damage, mechanical breakdowns, or electrical issues and may not appear in disk management tools.
If your drive appears in your system’s disk utility but the partition does not mount properly, it’s a strong indicator that you're dealing with partition corruption, not hardware damage.
Initial Precautions Before Recovery
When facing a failed partition, your first instinct might be to fix it immediately. However, acting without caution can make recovery more challenging or impossible. Before using any tools or commands, follow these critical safety steps:
- Stop using the drive immediately to avoid overwriting lost data and making recovery impossible.
- Disconnect external drives safely and shut down internal systems to prevent further damage.
- Back up any accessible files right away, even small ones, before the partition becomes unreadable.
- Use external storage or disk imaging tools to create a full clone of the drive for added safety.
- Avoid using DIY fixes with format or initialise options, as they can overwrite recoverable data structures.
- Only perform read-only actions until you're certain the data can be safely recovered.
- Seek professional help if the data is irreplaceable or the drive is making unusual noises.
Restoring a Failed Partition on Windows
When a partition fails on Windows, the system might label it as "RAW," “Unallocated,” or simply refuse to assign it a drive letter. Fortunately, there are several steps you can take to diagnose and potentially restore the partition without risking further data loss.
Use Disk Management to Assess the Partition
Start by checking if Windows still recognises the drive:
- Press Win + X and select Disk Management.

- Look for the drive in question. See if it is marked RAW, unallocated, or missing a drive letter.
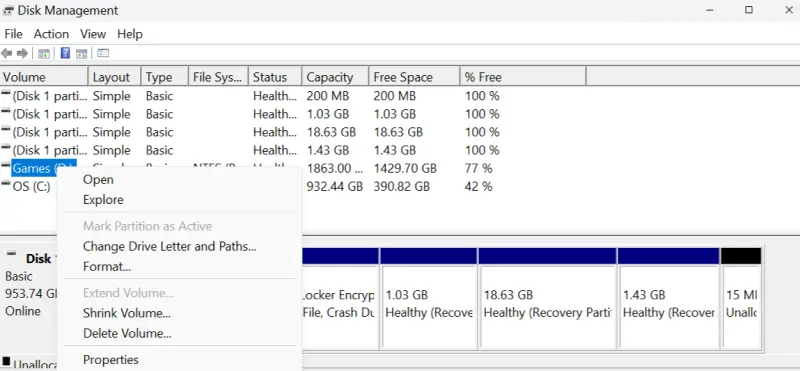
- If it appears healthy but unassigned, by right-clicking and selecting Change Drive Letter and Paths.
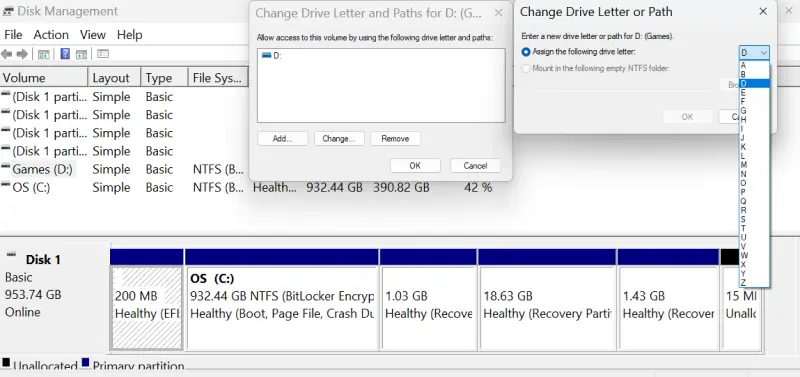
- Assign a new drive letter to the device.
- Do not format the drive, even if prompted – this will erase recoverable data.
Tip: If Disk Management displays the partition but labels it as RAW or unallocated, there is a high chance that data is still present. It just isn’t readable by the OS.
Run CHKDSK or Use Command Prompt
If the partition is still visible but inaccessible, try CHKDSK:
- Open Command Prompt as Administrator.

- Type: chkdsk X: /f (replace X with the correct drive letter).
- This command checks the file system for errors and attempts basic repair.
Important Note: If the drive is RAW or showing signs of severe corruption, CHKDSK may do more harm than good. Only run it if you’re sure the file system is NTFS or FAT and the drive hasn’t been re-initialised.
Use Windows File Recovery Tools
If CHKDSK doesn’t help, try third-party software:
These tools can detect deleted or hidden partitions and allow recovery without formatting.
Note: Always install recovery tools on a separate drive to avoid overwriting your lost partition.
What Not to Do
Avoid these common mistakes during Windows partition recovery:
- Don’t format or reinitialize the drive when prompted.
- Don’t install recovery tools on the same drive as the failed partition.
- Don’t clone over the original partition without making a verified backup first.
- Don’t continue using the drive once recovery begins, as this increases the risk of data overwriting.
Restoring a Failed Partition on macOS
When a partition fails on macOS, it might appear greyed out in Finder, disappear entirely, or prompt messages like “The disk you inserted was not readable by this computer.” While macOS offers robust built-in recovery tools, it’s essential to proceed carefully to avoid unintentional data loss.
Use Disk Utility to Identify and Repair Partitions
Start with macOS’s native diagnostic tool:
- Open Disk Utility from Applications, then select Utilities.
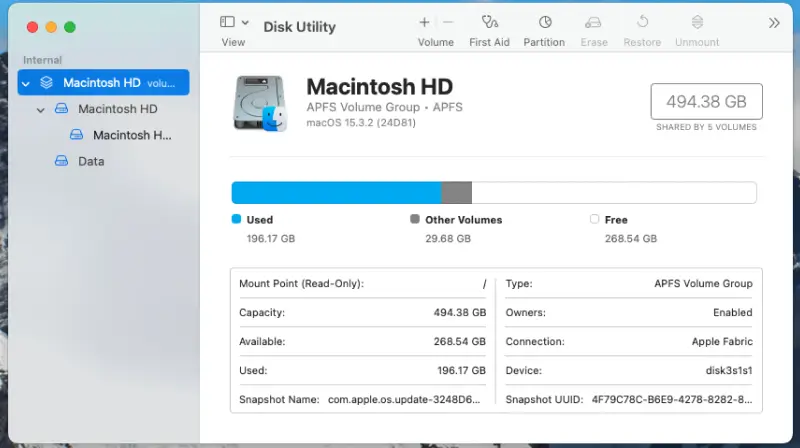
- Look for the affected drive or volume in the left-hand panel.
- If it appears but is greyed out, select it and click Mount.
- If the drive fails to mount, select it and click First Aid. This will attempt to repair the file system.
Tip: First Aid is non-destructive and safe to run. However, if the drive is physically failing, it may not succeed.
Use Terminal for Manual File System Checks
If Disk Utility doesn’t work, Terminal can offer a more direct approach:
- Open Terminal from Applications, then select Utilities.
- Type: diskutil list to view connected storage devices and identify your target disk.
- Use the commaBefore attempting any form of restoration, it’s vital to understand that improperly handling a failed partition can lead to permanent data loss.
(Replace X and Y with your disk and slice numbers – for example, /dev/disk2s1)
This runs a file system check similar to CHKDSK on Windows and may repair minor corruption.
Note: Don’t proceed if you’re unsure of the correct disk identifier. Running commands on the wrong disk can cause irreversible damage.
What Not to Do on macOS
Avoid these risky actions that could jeopardise your data:
- Don’t erase or reformat the drive when prompted.
- Don’t run First Aid repeatedly. If it fails once, further attempts might worsen the damage.
- Don’t install recovery software on the drive you’re trying to recover.
- Don’t use cloning tools unless you’re 100% certain the source isn’t failing physically.
Preventing Partition Failure in the Future
While partition failure can happen unexpectedly, adopting a few best practices can significantly reduce the risk of data loss and system disruption.
- Utilise backup tools such as Windows File History or macOS Time Machine to automate regular backups.
- Maintain at least one offsite or cloud backup in addition to local copies for essential data.
- Consider full-disk imaging for sensitive partitions or dual-OS environments.
- Always shut down properly through the operating system to avoid partition corruption.
- Never force power-offs, as abrupt shutdowns during write operations can damage file systems.
- Use only trusted tools like Disk Management or Disk Utility when modifying partitions.
- Never interrupt partitioning processes, as doing so often leads to corruption.
- Monitor drive health regularly with tools like CrystalDiskInfo or SMART Utility.
- Install OS and driver updates regularly to prevent bugs that affect partitions.
- Keep storage firmware up to date to maintain compatibility and performance.
When Built-In Tools Fail: Turn to the Professionals
Despite your best efforts, there are times when software tools and system utilities simply aren’t enough. Severely corrupted partitions, accidental formatting, or underlying hardware damage often require more than consumer-grade recovery solutions.
In these cases, seeking help from a certified data recovery provider is the safest course of action. Working with a failed partition can aggravate the issue and potentially cause the permanent loss of valuable files. Professional data recovery services have the expertise, specialised tools, and cleanroom environments necessary to handle even the most complex failures.
Secure Data Recovery offers specialised, comprehensive solutions tailored precisely to your needs. Our team ensures a seamless and convenient recovery process for a hassle-free, high-performance data security solution. Contact us today at 0800 102 6925 to speak with our specialists and begin the secure recovery of your data.


